Archive for the ‘knots’ Category

Copper Bracelets

31 December, 2011 13:41

Picture of 2 copper braided bracelets Ashley 2976 and 2979

Copper Bracelets

I made these bracelets a while back. The one in the foreground is in the style of Ashley 2979, a French Sinnet with 4 strands. The one in the background is in the style of Ashley 2976, also with 4 strands. Ashely notes that we are calling these “French Sinnet” while the French call them “Tresse Anglaise”. Ashley also notes that these sinnets are usually made with an odd number of strands, the simplest being 3. I have usually worked with an even number.

This wire is AWG 16 gauge copper electrical wire stripped of insulation. You get 3 pieces from each length of wire. Some types vary in color by strand. You will need approximately 2 times the length to be braided of each strand plus enough to hold on to.

To make 2976, start with 4 strands holding 2 strands in each hand. Take the strand that is furthest away over 2 under 1 and back around, alternating. The strands end on the same side they started.

To make 2979, start with 4 strands in one hand. Work the furthest one under/over/under and back around. Repeat.

Color is from heating with a torch while applying solder to bind the ends. Ends are then cut and filed smooth.

Rope Ornament

22 December, 2011 16:23

Rope Christmas Ornament as 3 interlocked rings

Christmas Ornament

I made a Christmas ornament from a scrap left over from the rope wreath. I unraveled the strands and re-made the 3 strands into 3 interlocked grommets as in Ashley 2864,2865. I probably should have used a bit longer piece. Ashley recommends starting with a length 3 times the desired circumference plus 6 times around the rope. Normally, I use an overhand knot to hold the stands where they meet. With the shorter length, I cut them just long of flush and whipped the ends down.

Christmas Rope Wreath

19 December, 2011 21:59
Picture of braided rope wreath with cross finish underneath

Rope Wreath

The latest knot project is a braided rope wreath. This is based on the description in Ashley #2241.

Start with about 3 meters (10 ft) of #16 galvanized wire. Halve it and clamp the sharp ends in a vise. Insert a suitable hand-hold such as a screwdriver shaft in the bight and twist the pair until it lays flat and will hold shape. Form the twisted wire into a hoop about 35 to 40 cm (14 to 16 inches) twisting the overlapped ends together. Wrap the hoop with wadded newspaper or other wrapping to make a form. I used newspaper because I intended to remove it. The split-tube pipe insulation may also work. You want a bit of thickness,say 50 cm (2 inches), some give, and a uniform donut shape.

Follow the directions in Ashley #2241 to construct the knot. Start with 30 meters (96 feet) of 1 cm (3/8 inch) rope. Cut this in half. With the first piece, do 8 wraps, 3 times around, leaving about a little over a meter hanging. Use a clue (a cord of a different material or color) to wrap 8 wraps the other way. Get the wraps as evenly spaced as you can. Now go in parallel to the clue with the second piece of rope weaving over-under. When you get back to the beginning, take the strand under where you were over before. Take this over-under pattern around 3 times. The third time through, make sure that both of the patterns are over-under in both directions. Remove the clue.

When you complete the first level of plait, before you begin doubling, correct any errors by pulling a clue through the knot chasing the line with the error into the knot until it exits. Pull the offending line out leaving the clue. Correct the error by re-weaving Ashley #127. Then follow the clue to the exit with the corrected strand.

Now choose one end or the other of both pieces to pull back to about a 1 meter (3 feet) length. Make sure that these are from the left-hand and right-hand weaves and that they exit in the same direction. This will be the end that will form the final decoration. Pull the excess out through the knot, 6 times around for each strand. Once this is complete, you should find the other ends to be about 1 to 2 meters. Once the original layer is complete and correct, and adjusted, double the first layer in each direction. Then begin removing the excess from the knot making the long tails longer. Work from where the short tails are. Hold them exiting and trailing away from you. Draw up the body with all strands, drawing out slack in loops and rotating the excess toward the exit with the longer strands. Some strands need to go around several times to reach the exit. Finish by bringing all 4 tails to the same exit point (or as close as you can get). Seize the 4 together. Plait a 4 strand flat plait Ashley 2967 (XX in the text drawing below). When a suitable length is formed, form a bight on each side using the longer strands. Seize (verticle bar) near the end and near the central portion along with a splint of wood to hold the cross piece out.

              XX
              XX
       ⊂|=|XX|=|⊃
              XX
              XX
              XX
              XX
              XX
             ——
             ||||

Continue plaiting beneath the crossing for a suitable distance. Whip the ends of each strand. Seize the 4 strands together close by the end seizings (horizontal dash). Cut each strand just beyond the whipping. As a variant, consider drawing the ends to the middle so that the pendant cross in in the middle.

Lawnmower Starter Rope Replacement

19 May, 2011 14:25
Screws to be removed from top cover

Figure 1

The other week when I pulled the rope on the mower, the rope broke off. Fortunately, the mower started and I just had the rest of the back yard to do. I finished it up, waited for the mower to cool and started the repair job.

Picture of pull starter cover with location of fueltank screws

Figure 2

My mower is a Yard Machines by MTD 22-inch side-discharge high-wheeler that I bought 15 years ago.

I have replaced the rope at least a couple of times. Here is how I do it.

For safety, disconnect the sparkplug wire from the sparkplug by pulling on the rubber cover.

There are two screws that retain the top cover. The screwdriver is pointing to one of them, the other is on located on the nearer side. Remove the screws with a Phillips screwdriver. Remove the top cover noting the index tab at the rear that engages the fuel tank. Also note the slot where cover allows the pull rope to pass through.

Location of lower fuel tank screw

Figure 3

Using a 5/16″ socket, break the 3 hex bolts on the top of fuel tank ring loose (Figure 2). Using a 5/8″ socket, remove the bolt located under the fuel tank (Figure 3). Catch the spacer that is located between the engine block and the tab on the fuel tank. Remove the 3 screws on top. Lift and tilt the fuel tank toward the rear of the mower. It will remain attached by the fuel line.

Location of 2 bolts at the front of the engine

Figure 4

The metal engine shroud is now exposed. Brush any dirt away from the lower end of the oil filler pipe where it enters the engine block. The oil filler will be loosened but not removed. But if it does fall out, cleaning will prevent dirt from falling into the crankcase.

Location of shroud screws at the back of engine.

Figure 5

There are two bolts on the front of the engine (Figure 4) and two bolts (Figure 5) on the back of the engine and the bolt that holds the oil filler. Using a 3/8″ socket, break loose the two front bolts and the two rear bolts. Use a 5/16″ socket to remove the bolt on the oil filler neck. Gently lift the oil filler neck to disengage the peg that holds the oil filler neck to the shroud. Twist oil filler neck slightly to get it out of the way.

Using the 3/8″ socket, remove the 2 screws each at the front and rear. Now lift straight up to remove the shroud and pull-start assemble. The starter will come out of the cup that is on top of the flywheel which engages the ratchet of the pull starter.

Pointed melted portion of nylon starter rope

Figure 6

Looking at the underside of the shroud, you can see the pulley that the starter rope needs to run around.  A tube inside the rim of the pulley (at approximately 9 o’clock position Figure 7)  is where the starter rope needs to be attached.  There is a small peg located opposite that will assist in winding the starter rope take-up spring.

Make sure the starter rope end is ready.  Measure the new rope against the old and cut to length.  Use a figure-8 knot to hold the rope in the handle.  A new rope will have the nylon melted and may be ready to go.  The melted portion should be no larger than the rope diameter (Figure 6).  If it too large or you have trouble inserting it in the next step, heat the end of the rope with a flame or soldering iron.  Use two pieces of wood to roll it into a pointed shape.  Be Careful: Hot nylon can give you a nasty burn.

Underside of starter pulley

Figure 7

Rope through tube on pulley and shroud

Figure 8

As you wind the pulley in a counter-clockwise direction, not that as you begin to feel tension on the spring, the ratchet levers are pushed out of the center area.  These will engage the ridges in the cup that is on top of the flywheel.  Continue winding the pulley 3 turns stopping when the tube is lined up with the hole in the shroud where the starter rope comes through. Push the pointed end of rope through the shroud and through the tube (Figure 8).  Tie a figure-8 knot in the end.  Slowly feed the rope into pulley as it unwinds.  When the spring is relaxed, there should be slightly less rope exposed than it takes to reach the location on the mower handle.  This slight bit of tension keeps the handle from drooping.  If the rope is too long, stretch it out, re-tensioning the spring, draw in a few inches and tie a new knot.

Lower the shroud over the flywheel.  Align the bolt holes, insert and finger tighten  1 bolt front and 1 bolt back.  Verify the operation of starter ratchet.  Release the blade-brake and pull the engine. Verify that the starter rope rewinds.  Insert and finger tighten the remaining bolts on the block.  Carefully, so that it does not pull out, position the peg of the oil-filler neck back in the hole in the shroud.  Insert the bold and tighten.  Tighten the 4 bolts front and rear.

Location ot the spacer

Figure 9

Pass the handle and rope through the mounting ring of the fuel tank. Reposition the fuel tank on top of the shroud.  Insert and finger tighten the 3 bolts on the ring.  Under the fuel tank, insert the long, shouldered bolt through the tab on the fuel tank, then through the spacer (located above the end of the finger in Figure 9) , and finally into the engine block.  Verify the adjustment and tighten all bolts.

Loosen the starter-rope guide on the handle to slip the rope into it.  There should be a slight tension.  Just enough to hold the handle in place.  If the rope is too short, it will put tension on the spring and wear the ratchet.  If too long, the handle will droop and snag shrubbery as you mow.  Verify operation by pulling the engine with the blade brake off and allowing the starter rope to re-wind.   If any of these checks are out, redo the steps above to make the appropriate adjustments. Reconnect the spark plug. Mower is ready to use again.

Ashley 2269

22 October, 2007 17:19

Notes for Ashley book of knots on 2269-2271
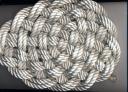
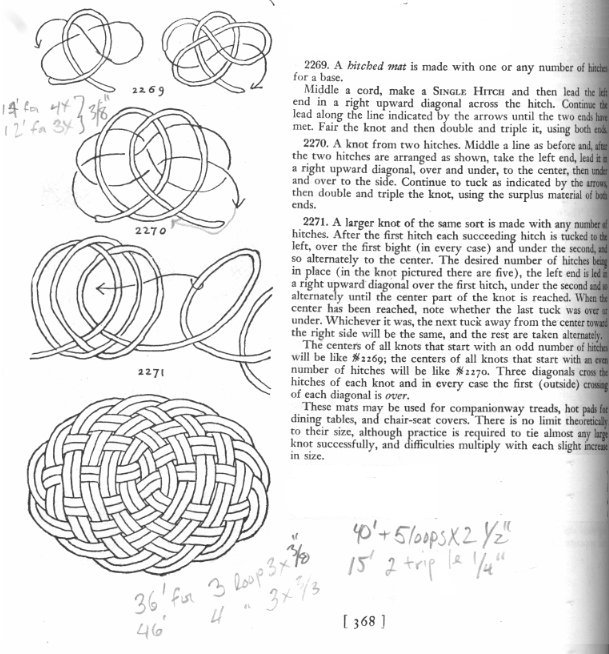
I been working with Ashley 2269 a bit lately. Perhaps to excess. In any case, it is an interesting flat knot. It is 1 or more hitches (loops) crossed by 2 bights. The resulting knot may be doubled or tripled to make the mat larger. More than triple is hard to work with as the 3 parts stay flat but 4 or more do not. The weave of the knot holds the two edge pieces down and one in the middle will stay fair. But if there are two or more in the middle, tension becomes critical and one or the other of the strands will rise up and be difficult. Tripling is about the limit.

I have made about half-a-dozen of these mats as gifts for use as table hot pads and such. I have tried a number of combinations of hitches and a couple of different sizes of rope. Using manila or sisal will provide good heat resistance. Using twisted nylon will give a lovely white mat which is fairly soft. Nylon melts at about 350 degrees so may not be best for a hot pad.

Nearby is a thumbnail of the page from my ABoK where I have made some notes.

The knot is fairly easy to make. If you have trouble with the hitches flopping around, use some masking tape at the top and bottom crossings to hold them open and in place while you lead the bight across and back. The first pass across and most of the way back seems totally counter-intuitive. The knot does not get engaged and woven until the second half of the coming back and then completes on the final crossing. Pay attention to the difference between even-numbers and odd-numbers of hitches following Ashley’s advice as the crossing in the middle of the knot is different. Once you have gone through the knot, follow the other line exiting the knot all the way through going over or under wherever it goes over or under in parallel. Repeat for tripling. Once the line is doubled or tripled, work the knot up to remove the excess, make the hitches rounder and the bight elongated. Allow a foot or two of extra line to make adjustments. Whatever you work out of the slack has to be carried all the way to the end. I tend to work in only one direction so that means 3 times around. If you figure out where the middle is… When you get it all worked, hide the ends underneath, whip the ends, cut them off neat, stitch them down and the top will look endless.
Five hitches in white nylon

Two hitches tripled in sisal