
To fill the gap, I set the edge up level and clamped the part to hold it . Then I made a small dam about 1/8″ high for each end out of folded masking tape. Finally, I put a masking tape fence along each side of the edge. I mixed up 1 pump (about 1 ounce) of epoxy and poured it in between the fences. It flowed into the gap a bubbles began to come up. To speed the process, I pinched the sides of the gap with pliers to squeeze the air out, releasing sucked the epoxy in. Repeat as desired.
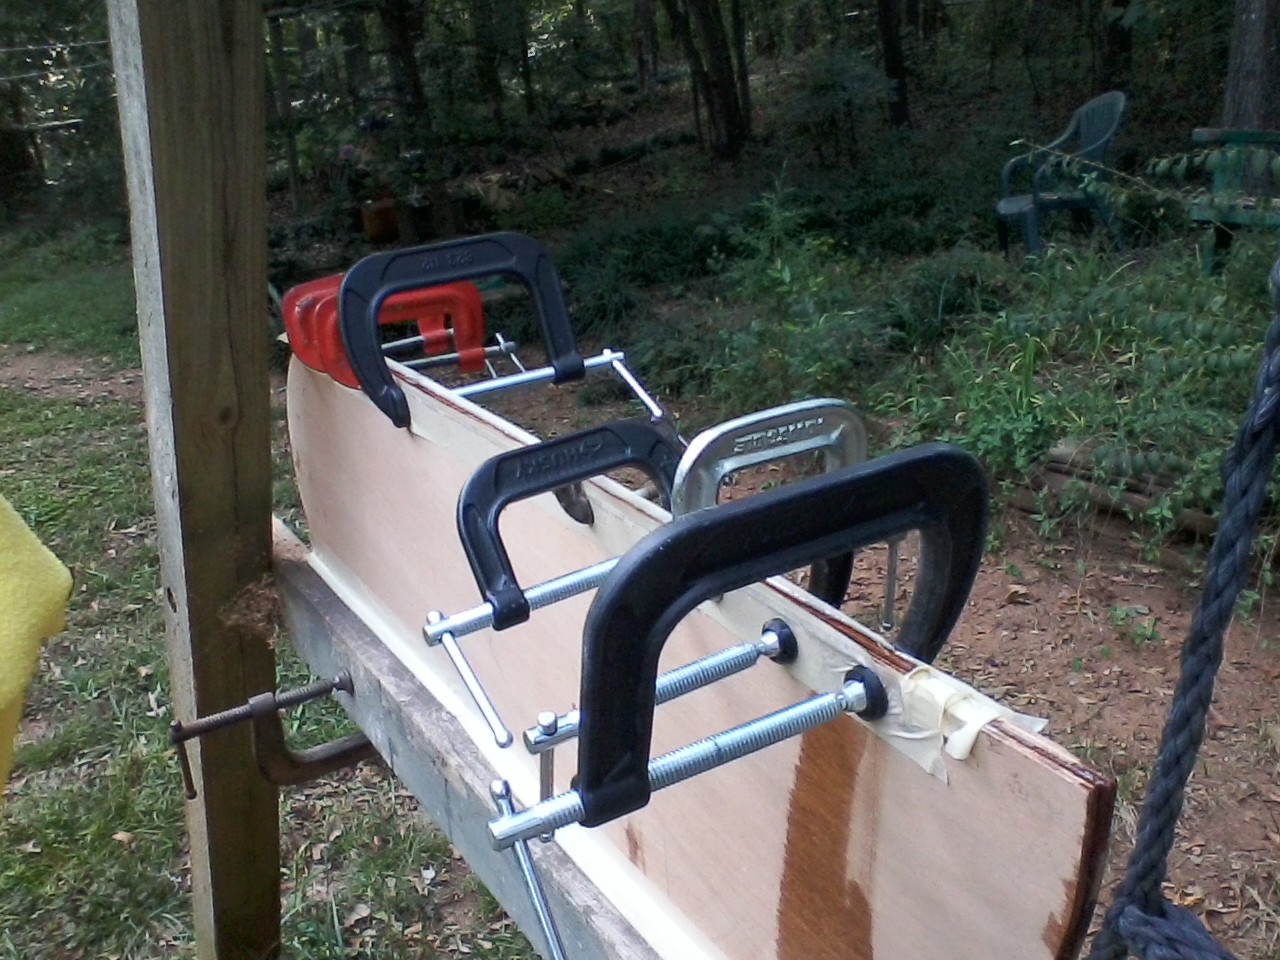
When the gap was filled with epoxy, I put C-clamps (G-clamps in some parts of the world) on wherever I could see that it squeezed the gap closed. This caused the excess to squeeze out but the fences and the dams kept the excess from flowing down the sides. (The drip you see in the picture is from the other edge before I learned the part about the dams at the ends.) When the epoxy was set, removed the clamps and tape. Sand the excess hardened epoxy off. The gap is filled.
CHAIR-LOC info page
In my previous posts here and here I have referred to product called Chair-Loc. This is is labeled on my bottle as “rosin triethanolamide”. My bottle was made by The Chair-Loc Company of Lakehurst, NJ.
I have not been able to find Chair-Loc in local stores. I found that it might be available at Contantines Wood Center. Either a 2oz bottle alone ($4.25) or a 3oz bottle in a kit with syringe and tips to inject the joint ($11.95). Also at Western Wood Doctor with similar but different pricing.
Google search and Amazon provide a number of false leads and alternatives.
Wonderlokking Tite Chair glue is a cyanoacrylate glue which may work well at repairing chairs. The problem is that is really is a glue. If you have to disassemble the chair to repair the wood, covering, or as a result of refinishing, the glue will stick to the wood fibers and tear them apart. My theory is that if you want to repair furniture, you want to do it with glues that fill, swell, tighten, but do not stick. CA glue is sticky, particularly if you get it on your fingers.
Behlin Swel-Lock (scroll to page 16) may work, I have not tried it. The MSDS says that it is dipropylene glycol. I see information on the web that antifreeze (ethylene glycol and diethylene glycol) is a traditional fix for loose ax handles. I have not used it and cannot comment on how well it works or how long it lasts.
Briwax ChaiRX is a self-crosslinking vinyl acrylic polymer emulsion. While the MSDS states that the emulsion contains a large amount of water, if, on drying, the vinyl acrylic polymer remains in the wood fibers and joint, the joint should remain tight some time. This may be the best replacement available today for my favorite chair repair.
Briwax MTD, a wood sweller for mortice and tenon joints appears to be similar and may work as well.
When I get time, I will update the links to Chair-Loc in other posts to point to this info page.
Indiana News


Thanks to the generous donations and support of the following organizations and foundations, this project was made a reality for the Muncie Children’s Museum: The Boren Foundation, Inc., George and Frances Ball Foundation, The Community Foundation of Muncie and Delaware County, Inc. and Robert A. and Beverly D. Terhune Fund.

In other news, David found out Monday that he has been designated an “Indiana Artisan”. Selection of Indiana Artisans is a juried process. You can go to www.indianaartisan.org to learn more about it.
You can see more of David Calvin’s work at his own website, Whimwood.net.
Veneer Mill


Labor Day weekend is a big one in Dacusville, SC. Saturday and Sunday were the Dacusville Farm Days. This event has been going on on Labor Day for quite a number of years. A combination of tractor and engine show, crafts, traders, music, and fun. When Phillip and I went last year, we got there too late and missed the veneer mill. While we did see the sawmill operating, Phillip really wanted to see the veneer mill. I checked the on-line schedule and suggested that we get there by mid morning.
We got to the site on Pace Bridge Road right on schedule. The sawmill start was running late and the veneer was scheduled after that. While we were waiting for the mills to run, we got some pictures of the steam mill engine and it’s boiler, a shingle sawmill run from a tractor PTO belt, and more tractors than you can shake a bundle of sticks at.
Both the sawmill and the veneer mill are in separate sheds, each powered by its own large single cylinder diesel engine. The flywheels on the engines are about 6 feet in diameter. Since we got there early, we got to see the diesels started. First a pot-engine drives an air compressor to fill the receiver to 9.5 kg/cm2 (135psi). While this is going on, the starting team opens the cylinder head valve and moves the piston to top-dead-center by using a long metal bar engaged in holes in the flywheel to pull the flywheel around. Next the compression valve is closed and a plug on the cylinder-head is removed. Starting fluid is poured in and the plug replaced. When the air pressure is as required, a valve is opened and the fly is turned by compressed. Once the flywheel is turning, the engine begins to ignite fuel and white smoke pours out gradually becoming clearer as the engine begins to heat up. Once the engine is warmed up, a clutch is engaged to turn the line-shaft. Belts are checked. Everything is good. The engine is brought to operating speed and everything is now moving.
The saw mill consists of a carriage and circular saw. As the log is sawed, the slabs are take off the back and brought to and edge-saw table that makes a rough plank by trimming both edges as the slab is conveyed through the edge-saw. Lumber is taken of the back and stacked.
The veneer mill has a similar diesel engine. The veneer mill itself consists of a cast-iron frame with the log to be worked suspended by two long screw-jacks with face-plates that support and turn the log. the log is scored so that each turn produces two pieces. The jacks are turned by a large 2 m (6 ft) reduction gear. The horizontal veneer knife is held in a heavy cast-iron frame that is moved by a ratchet a little bit at a time into the log. Two men catch the veneers as they come off, roll them and hand them to spectators.

After watching sawing and veneer, we had some lunch. We looked for a friend who restores small engines and shows them at shows like this but he had already packed up by the time we were wandering around. After watching the blacksmith and the Parade of Power, we departed. Near the exit, we realized that we had just missed the threshing of about 25 bushels of wheat. Maybe next year.
Chair Repair
 We have had the dining room furniture for about 28 years. I have put some of it back together. Originally from J.C.Penney, the furniture is nice wood but quickly put together. The biggest problem in getting it apart is that the spindles, back, rungs, and frames are held together with those corrugated wood fasteners. It is very difficult to get the chairs apart without some damage. Ideally, you can take a chair apart with a firm tap (with a hammer and a protective wood pad) to separate the glue joint. With the fasteners, careful wiggling and pulling is required in addition to the tap.
Working with the pictures in the Gallery, a back and side view of the chair. In the second row left, a screw has worked loose allowing the frame to flex. Normally, the frame would be rigidly held by he seat. On the right a spindle has come loose from the leg, allowing the other legs to flex and work their joints loose. In the third row, as the frame works, the pegs that are glued into the the leg loosen and work. The glue block that holds the frame tight, has broken loose and is retained only by the staples used in assemble. Third row, right, before dis-assembly, use masking tape and a marker to identify the left and right pieces and where they are in the chair and how they are oriented. The back pieces are labeled 1-Top, 2, 3, 4-Bottom, Left (relative to sitting in the chair), Right. The Legs, Left-Front, Right-Front, the frames are labeled Front-Left (with the label to the left), Frames – Rear-Left, Left-Rear (with the label to the rear), Right-Rear, Runs Rear-Left, Left-Rear, Right-Rear, Front-Left-Top, Front-Left-Bottom.
When the labeling is complete, use a stubby Phillips screwdriver to remove the screws that hold the seat to the frame. Remove the seat d set it aside, put the screws in a baggy. Then use tapping and pulling to disassemble the chair. If a joint is tight and firm, there is no need to separate it. But be diligent to get the loose ones apart. Clean the loose glue from surfaces, holes and spindles of the separated parts. I prefer “Chair-Loc”, a compound that swells the wood and tightens the joint rather than glue for re-assembly. For it to work properly, clean wood is best. On the other hand, excessive scraping or sanding will make the joint loose and require additional work to make it tight.
On re-assembly, plan ahead. Make sure that you understand what joints are going to go back together and how. With chairs, the legs move toward the center simultaneously during re-assembly. Put Chair-Loc in each of the open holes and on the spindles before insertion. Work quickly before the wood has a chance to expand. Assemble all 4 legs, the 4 back panels, 4 frame pieces, and 5 rungs and press together. Use bar clamps and tapping to bring them firmly together. Make a bowline knot and throw it over a leg and wrap the chair with rope. It takes about 30 feet (10 meters) to wrap. Use a taut-line hitch around the back fineal and tighten to hold firmly while the Chair-Loc works. See the Gallery bottom left. Drip some Chair-Loc in the joints that you did not separate as well. Glue the glue blocks and clamp. Gallery bottom right. Use a damp rag to remove any spillage.
After a couple of hour, remove the clamps and rope.
Flower Flyer Rebuild
The Flower Flyer started as a re-build. My wife had found a rusted coaster wagon in someone’s trash and dragged it home. I built a body for it and painted it green. Phillip made a stencil and painted Flower Flyer on the sides. It was a pretty thing.
But the outdoor storage was hard on it and it developed dry rot. Time for a new body. I was sure that I had a picture of it but cannot find it. After I took it apart, I took a picture of the body as it was.

Using a sheet of 3/4 inch plywood and higher 1×6 pine sides, I built the new body. This time I put scuppers in it so the body would drain better. I used brass screws to reduce the rust and the start of rot. I also treated all of the parts with linseed oil and pine tar before assembly. Here is the new Flower Flyer.

- Rebuilt Flower Flyer

- Scupper Detail on each corner

Log Planter

My wife likes to garden and in the hard clay soil, some things do better in a planter. Her idea was to arrange the logs in a circle, hold them together and fill it planter with potting mix. My son and I have made a number of them.
Cut a number of logs roughly stove length. If you like uniformity, use a gauge stick or a knotted rope as a measure. How many? About 3 1/2 times the planter diameter divided by the log diameter. For example say 3 feet across. Time 3 1/2 is 10 1/2 divided by 6 inches = 1/2 foot = 21 logs. Or in metric say 1 meter, times 3 1/2 = 3 divide by .15 = 23 logs. Cut the ends square so they will stand on end on the ground.
On previous planters, I used 16 guage galvanized wire. For this one, I used the soft iron wire used to tie reinforcing bars together for concrete. Find it near re-bar and concrete at Lowe’s or Home Depot. Galvanized doesn’t rust, in fact it stays shiny for years. I do not know yet how this darker wire will look or hold up but I suspect the darker color will be more aesthetic than shiny wire in a rustic planter.
If you choose the re-bar wire, you will need to draw it straight before you use it. Twist the end around something substantial, spool out enough to go around twice plus a bit more. In our example above about 15 feet (4 meters). Give a tug to take the kinks out. Do not cut the wire yet.
Arrange the logs in a circle where you want them to be. Put them as close together as they will stay.


Wrap the wire around the logs two times keeping the wire close together and 1/2 to 2/3 up the sides of the logs.
Pull the wire hand tight cross and twist it a couple of turns to tie the ends together. Have enough outside the twist to grab. Now cut the wire at the spool. Do any final arranging of the logs. Pull tension on the twist and begin to twist up the excess to pull and hold the planter together.


When the twist is about 2-3 inches (5 cm) from logs, stop twisting. This will be tight enough. And if you go to far, you risk breaking the wire.

I twist by the hand-over-hand method or by grabbing the twist with a locking plier and twisting. Either way keep tension on the twist as you twist it to keep the ends leading smoothly into the twist.
When it is tight enough, cut the twist.

Then turn the end of the twist back on itself and close the hook. Press the loop flat so it will not snag on anything. The cut end is SHARP!.

Chairs
Our dining room set was moderately expensive 25 years ago. It has held up well. But it is “factory made”, not “craftsman made”. The worst part of the factory is the machines that shoot staples and some sort of flat metal thing into the joints. These make repairs impossible. These items probably stabilize the joints while the glue dries. Because they are impossible to extract and damage the wood when they go in, they weaken the joint to begin with and make repairs impossible later when the joint lets go. I would recommend that Congress ban the domestic manufacture of furniture using these devices and the import of same.
Chair Repair
Today’s project was the re-assembly of a chair that was disassembled 3 weeks ago. The nature of chair assembly is that once you begin, you must finish all of the stick together parts in one session. The screw together parts can be done later but because of the way chairs are, they need to go together all at once. Allow adequate time. The three week lag was because I did not have a clear spot on a weekend long enough to keep it open ended.Let inertia work for you.
The first step in chair repair is get the chair completely apart. If the chair has failed catastrophically, there may be broken parts along with parts that are still quite tight together. If the chair is just wiggly and loose, many of the joints are probably ready to come apart with the appropriate amount of force. It may be difficult but you must make sure that you have all of the pieces that will or can come loose, loose.
IMPORTANT – as you remove each piece, mark it so that it can be re-assembled in the correct orientation. Make the left of the chair as you sit in it the left. Mark each piece in an inconspicuous spot with Front/Left/Top etc. so that you cannot be confused when it is time to assemble.
CAUTION – watch for modern short cuts that may render your chair difficult or impossible to repair. Staples, pins, repair plates, steel wedges are difficult to remove, damage the wood fibers and are the topic of another future blog entry.
Disassembly proceeds easily at first and then becomes more difficult as the pieces get harder to separate. For large pieces, this can mean working them apart by pulling and wiggling. I find wiggling the piece in a rotating pattern with occasional reversal of direct the most effective. Sometimes rocking side to side is best. Rarely, you may need to wedge some like a stick of wood where the scars will not show and leverage against it to get movement.
Another technique is the tap. Tapping with a rubber mallet can do the trick. Mine is white rubber and does not mark. A hammer, carpenter’s hammer or machinist’s, provide a firmer force. Protect the struck piece with a smooth piece of scrap. The sharp blow of a hard hammer may be more effective at breaking a glue joint. Let inertia work for you. Watch the rebound.
Once you have all of the big pieces apart, try and get the pegs out. Grasp the peg with a pair of slip-joint pliers. See if there is any movement at all. If there is, try to work the peg out its hole. If there is no play and tapping does not loosen it, skip it.
Inspect the pegs. Replace any that are cracked and those that have left a chunk in the hole.
Check the holes. Clean them out with a drill of the appropriate size. Remove any glue left in the hole. Modern glues may not stick to themselves or other glues. Old glue, such as hide glue needs to be renewed so get it out of there.
Clean up the ends of the rungs and the holes in the spindles and rails. Use 60 grit or 40 grit sandpaper to get the glue of and the pegs and pieces smooth. Get everything cleaned up for smooth re-assembly.
Once you have it apart, lay out the parts in the order that you are going to assemble them. Some chairs have to be assembled all 4 corners at once. Others like the one I was working on today can be assembled from front to back or back to front.
The first assembly is a dry assembly. It helps you to do the final assembly correctly and easily.
For my chair, I joined the two front legs with a rung, 4 pegs, and the front piece. Observe the surfaces and the left to right orientation. This I laid flat on the floor. I then added 2 rungs and a side piece on each side.
Separately, I assembled the back. There were 4 back slats, the back seat support, and a rung (which I could not get out). I then put the back onto the front. I noticed as I was doing this a hole that retained a piece of the peg. An I had replaced the peg with a fresh one because it was split. If I had been working with glue, I would not have had time to clean up the hole and get it together before the rest of the chair got too stiff to work with. This is why we do a dry assembly.
Work out how you will put the clamps on to pull everything up tight. You may want bar clamps ( quick-clamps work well) or a rope clamp. I used both.
Take it all apart again and lay it out neatly.
For the final assembly, I used Chair-Loc . I have used this in the past and it is good for about 7 years of daily use on these chairs. The chair I worked on today did not get completely disassembled last time I did repairs and so it has never really been tightened up in 25 years.
Repeat the assembly this time putting Chair-loc in each hole and spreading it around each peg or rung. Press everything together. Clamp it, tap it and get it real snug.
Give it a while to set up, put the seat on and screw in the screws.
The chair is now nice and tight.
Cat Bed
I have made a number of beds for the cats. This is a fairly quick and simple project. You need a table saw or a router with a 1/4 inch cutter that will cut to 3/8 inch depth.
I noticed that the cats liked cardboard and corrugated boxes and box lids of a certain size. This is the size that I made the box out of wood. The sides are a little higher than the preferred lids but my wife makes Polar Fleece “puffs” to fill the bottom and the cats seem to like them.
The first box lid that the cats liked was the tray that came in the citrus fruit from Florida. This tray had doubled sides and seemed to be a particular favorite of the cats and so became the model for size and proportion. This one is 16 by 10 1/2 inside. This makes the length 17 1/2 and the width 12 inches.
The basic idea is simple. Four sides and a bottom. The bottom is fairly fixed. It is 1/4 inch plywood. The sides give lots of options.
The first option is the choice of material. Pine, oak, and cedar are good choices. Pine is inexpensive and easy to find and work with. Oak is pricey and pretty. Oak looks good indoors and ages gracefully outdoors. Cedar is rot resistant and can be pretty. Not too expensive but cedar splits easily if the corner screws are over tightened. The height can by the 5 1/2 inch width of 1 by 6 or the 7 1/2 inch width of 1 by 8. And a couple that we have are from 1 by 4. Of course the 1 by is 3/4 inch thick.
The box construction is straight-forward. A rectangle with the long sides (length) overlapping the ends (width). The bottom is set in a groove around the bottom. The groove is 3/8 inch deep in the 3/4 inch thick sides. Cut the plywood about 5/8 inch wider than the width and 7/8 inch shorter than the length.
For the box above, this would be 2 pieces 17 1/2 inches and 2 pieces 10 1/2 inches. The bottom is 16 5/8 by 11 1/8.
NOTE: Follow all general and specific safety instructions for the tools you use.
Cut the side and ends to length. Set the saw blade (or router cutter) height to 3/8 inch above the table and remove the splitter so that you can dado a grove. Be very careful if this leaves the blade unguarded. Check the height with a piece of scrap and adjust it until it is just the right height. If you are using a router, you and your router may be happier and your cutter may last longer if you make several passes increasing the depth until the final depth is reached.
Set the fence so the close edge of the blade is 3/8 from the fence. Carefully make a pass through each piece. If you are using a 1/8 inch saw blade go on to the next step. If you are using a 1/4 inch router cutter, skip the next step.
Reset the fence so that the far edge of the blade is 5/8 from the fence and just a scosch more. Test it with the scrap. Try the plywood bottom for fit in the slot. If it is loose, move the fence closer. If tight, move the fence a bit farther way. When adjusted, make sure that you hold the previously cut edge toward the fence and carefully make a pass through each piece. When you have cut both sides, you may need to clean out the bottom of the groove with a 1/4 inch chisel.
You now have a 1/4 inch groove in all 4 pieces.
Trial fit the sides and ends against the plywood. The plywood should fully close the bottom. The sides should mate up tightly against ends.
Drill and countersink a hole in each side 1 1/4 inch from the bottom and another 1 inch from the top. IMPORTANT: Assemble with brass screws. Steel screws and galvanized screws will leave stains on the wood. Brass screws will turn a pretty verdigris if they do anything.
Line with a blanket made from Polar Fleece. Make sure that there are several thicknesses and that the ends and sides of the liner extend beyond the wooden sides.